
こんにちは、Nanayakuです。
今回は、RSpecでViewのテストのやり方を紹介します。
「capybara」のみを使用したテストを解説していきます。
「System Spec」については、rspec-rails 3.7の新機能!System Specを使ってみた - Qiitaを参考にしてみてください。
目次
何をテストするのか
そもそもViewの何をテストすればいいかと言いますと、ユーザーと同じように「ページに移動し、入力フォームに入力し、ボタンをクリックしたら想定通りの動きになるか」をテストします。
それを可能にするのが「capybara」と言うGemです。
インストール
Gemfileに「gem 'capybara'」を追記し、bundle installします。
Rails 5.1以降の場合は、デフォルトで入っているので、インストールは不要です。
gem 'capybara'
設定
インストールが終わっても、「capybara」を使用することは出来ません。
「rails_helper.rb」に、「require 'supports/capybara'」を追記することで使用できます。
# This file is copied to spec/ when you run 'rails generate rspec:install'
require 'spec_helper'
ENV['RAILS_ENV'] ||= 'test'
require File.expand_path('../config/environment', __dir__)
# Prevent database truncation if the environment is production
abort('The Rails environment is running in production mode!') if Rails.env.production?
require 'rspec/rails'
# Add additional requires below this line. Rails is not loaded until this point!

#↓これ
require 'supports/capybara'
#↑

# Requires supporting ruby files with custom matchers and macros, etc, in
 ・
 ・
 ・
テストの作成
今回は、新規登録とログインのテストを書いていきます。
CSSなどをなくした新規登録・ログイン画面のコードです。
<h1>新規登録</h1>
  <%= form_for @user do |f| %>
    <%= f.label :name, '名前'%>
    <%= f.text_field :name%>

    <%= f.label :email, 'メールアドレス' %>
    <%= f.text_field :email%>

    <%= f.label :password, 'パスワード' %>
    <%= f.password_field :password%>

    <%= f.label :password_confirmation, 'パスワード(確認)'%>
    <%= f.password_field :password_confirmation%>

  <%= f.submit "登録", class: 'btn-block btn-white vertical-btn' %>
  <% end %>
<h1>ログイン</h1>
  <%= form_for :session, url: login_path do |f| %>
    <%= f.label :email, 'メールアドレス' %>
    <%= f.text_field :email, class: 'form-control' %>

    <%= f.label :password, 'パスワード'%>
    <%= f.password_field :password%>

  <%= f.submit "ログインする", class: 'btn-block btn-white vertical-btn' %>
  <% end %>
今回のテストコードは下記の通りです。
require 'rails_helper'

RSpec.feature 'Users', type: :feature do
  before do
    @user = User.create(
      name: 'TEST_USER',
      email: 'test@example.com',
      password: 'password1234',
    )
  end
  it '新規登録する' do
    visit root_path
    visit new_user_path
    fill_in '名前', with: '太郎'
    fill_in 'メールアドレス', with: 'tarou@example.com'
    fill_in 'パスワード', with: 'tarou1234'
    fill_in 'パスワード(確認)', with: 'tarou1234'
    click_on '登録'
    expect(page).to have_content '登録に成功しました'
  end

  it 'ログインする' do
    visit root_path
    visit login_path
    fill_in 'メールアドレス', with: 'test@example.com'
    fill_in 'パスワード', with: 'password1234'
    click_on 'ログインする'
    expect(page).to have_content 'ログインしました'
  end
end
ここで出てきたコマンドについて簡単に説明していきます。
#テストを実行する前に定義するものを書きます。
#例)登録済みのユーザーなど
before do・・end

#何のテストをするか宣言します。
#例)新規登録・新しい投稿など
it '' do・・end

#指定したパスにアクセスします。
#パスの〇〇の部分は、「$ rauks routes」のPrefix Verbのこと
visit 〇〇_path

#入力欄とそこに何を入力するかを定義します。
fill_in 'フォーム名', with: '入力値'

#指定したボタンまたはリンクをクリックすることが出来ます。
click_on 'ボタン・リンク'

#ページ内に設定した文字列がちゃんと表示されているかを検証しています
#自分は成功すると表示されるアラートを指定しました。
expect(page).to have_content '文字列'
参考
他のコマンドについて調べたい人は、「使えるRSpec入門・その4「どんなブラウザ操作も自由自在!逆引きCapybara大辞典」 - Qiita」で詳しく解説しているので参考にしてみてください。
実行
「$ rspec」でテストを実行できますが、ディレクトリ・ファイルを指定することで、テストの時間を短縮できます。
$ rspec spec/features
実行すると画像のように表示されます。
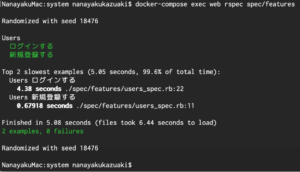
自分はDocker環境なのでコマンドが少し違います。
また、画像のように表示させたい場合は「[Rails・Docker]初めてのRSpec」で、オプションの設定方法を解説しています。
参考サイト
- 【Rails】RSpecとCapybaraのFeatureテスト書き方まとめ | にょけんのボックス
- 使えるRSpec入門・その4「どんなブラウザ操作も自由自在!逆引きCapybara大辞典」 - Qiita
最後に
備忘録がわりに作ったので、間違っている所とかあったら、コメントくれると嬉しいです。